Chapter 2. First steps with Docker and Kubernetes
2.1 Creating, running, and sharing a container image
2.1.1 Installing Docker and run Hello World container
Running a Hello world container
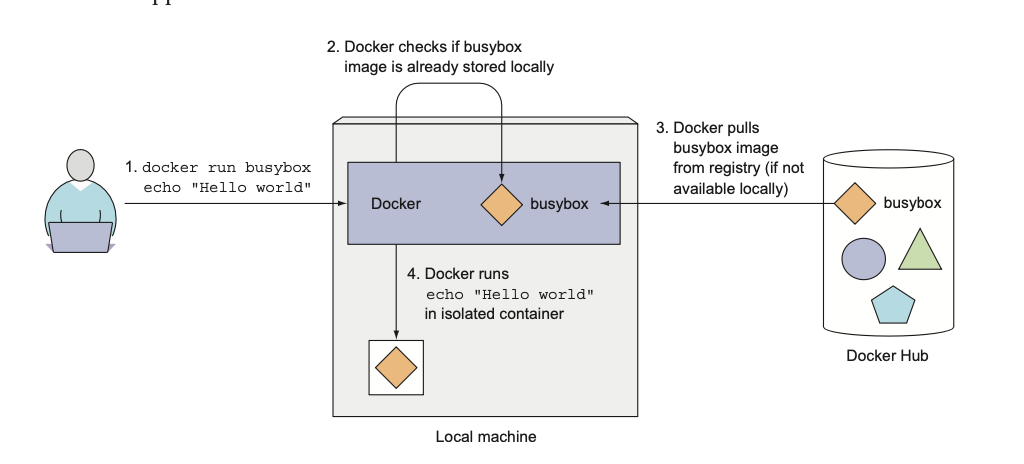
docker run busybox echo "Hello world"docker run busybox echo "Hello world"App was executed inside a container, isolated from another processes.
Understanding what happens behind the scenes
Running other images
docker run <image-name>docker run <image-name>Versioning container images
All software packages get updated, so more than a single version of a package usually exists. Docker supports having multiple versions or variants of the same image under the same name. Each variant must have a unique tag.
When referring to images with- out explicitly specifying the tag, Docker will assume you’re referring to the so-called latest tag.
docker run <image-name>:<tag>docker run <image-name>:<tag>2.1.2 Creating a trivial Node.js app
const http = require('http');
const os = require('os');

console.log("Server starting...");

var handler = function (req, resp) {
    console.log("Received request from " + req.connection.remoteAddress);
    resp.writeHead(200);
    resp.end("You've hit " + os.hostname() + "\n");
};

var www = http.createServer(handler);
www.listen(8080);
const http = require('http');
const os = require('os');
console.log("Server starting...");
var handler = function (req, resp) {
console.log("Received request from " + req.connection.remoteAddress);
resp.writeHead(200);
resp.end("You've hit " + os.hostname() + "\n");
};
var www = http.createServer(handler);
www.listen(8080);Run locally with node app.js
2.1.3 Creating a Dockerfile for the image
To package your app into an image, you first need to create a file called Dockerfile, which will contain a list of instructions that Docker will perform when building the image.
FROM node:7
ADD app.js /app.js
ENTRYPOINT [ "node", "app.js" ]
FROM node:7
ADD app.js /app.js
ENTRYPOINT [ "node", "app.js" ]FROMdefines the container image you'll use as a starting point.ADDcopies the app.js file from the current directory into the container image.ENTRYPOINTdefines the command that will be executed when the container starts.
2.1.4 Building the container Image
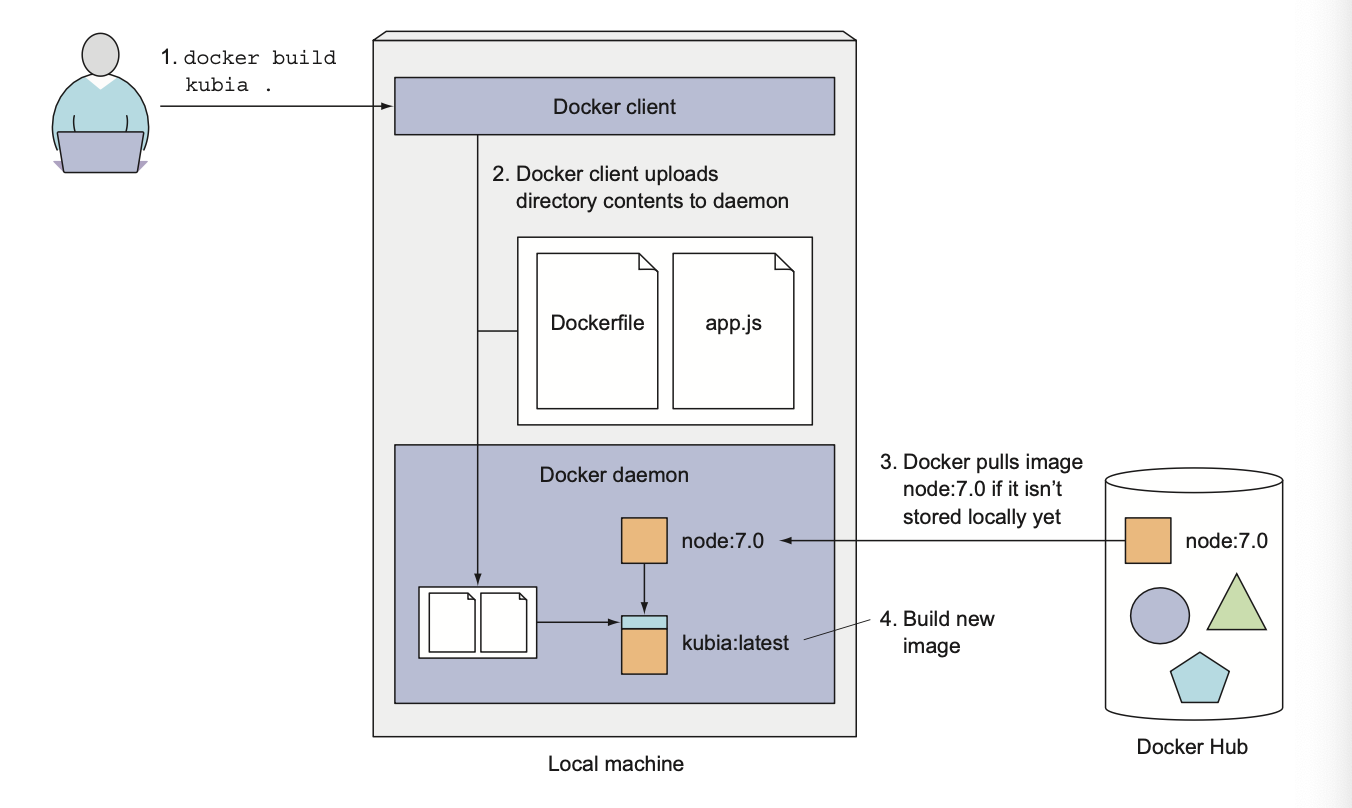
docker build -t kubia .docker build -t kubia .-tflag is used to tag the image with a name.
Understanding how an image is built
The build process isn’t performed by the Docker client. Instead, the contents of the whole directory are uploaded to the Docker daemon and the image is built there.
The client and daemon don't need to be on the same machine at all.
Before actual building Docker will pull all the layers for the base image from the registry if they don't exist locally.
Understanding image layers
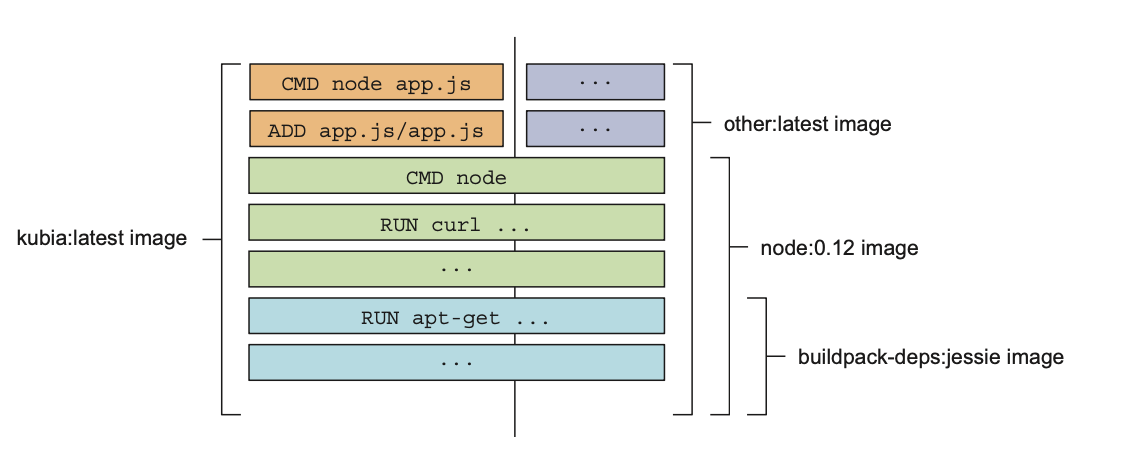
An image isn’t a single, big, binary blob, but is composed of multiple layers.
If you create multiple images based on the same base image, all the layers comprising the base image will be stored only once.
Also, when pulling an image, Docker will download each layer individually. Several layers may already be stored on your machine, so Docker will only download those that aren’t.
docker images kubiadocker images kubiaComparing building images with Dockerfile vs. manually
Dockerfiles are the usual way of building container images with Docker, but you could also build the image manually by running a container from an existing image, executing commands in the container, and then committing the container final state as a new image.
This is exactly what happens when you build from a Dockerfile, but it’s performed automatically and is repeatable, which allows you to make changes to the Dockerfile and rebuild the image any time, without retyping all the commands.
2.1.5 Running the container image
docker run --name kubia-container -p 8080:8080 -d kubiadocker run --name kubia-container -p 8080:8080 -d kubiaTelling docker to run the container with name kubia-container, map the local port 8080 to the container port 8080, and run it in the background (-d) based on the image kubia.
Accessing your app
curl localhost:8080curl localhost:8080Listing all running containers
docker psdocker psGetting additional information about a container
docker inspect <container-name>docker inspect <container-name>Will print some low-level container information in JSON format.
2.1.6 Exploring the inside of a running container
Because multiple processes can run inside the same container, you can always run an addi- tional process in it to see what’s inside. You can even run a shell, provided that the shell’s binary executable is available in the image.
Running a shell inside an existing container
docker exec -it <container-name> bashdocker exec -it <container-name> bashThis will run bash inside the container and attach the terminal to it.
The bash process will be run in the same Linux namespace as the main container process.
-iflag tells Docker to keep the stdin stream open, so you can send commands to the shell.-tflag tells Docker to allocate a pseudo-TTY, which allows you to attach your terminal to the shell running in the container.
Exploring the container form within
ps auxps auxOnly three processes - no one from the host system.
Understanding that processes in a container run in the host OS
ps aux | grep nodeps aux | grep nodeIf you now open another terminal and list the processes on the host OS itself, you will, among all other host processes, also see the processes running in the container.
If using Mac or Windows need to login into the VM first.
This proves that processes running in the container are running in the host OS. If you have a keen eye, you may have noticed that the processes have different IDs inside the container vs. on the host. The container is using its own PID Linux namespace and has a completely isolated process tree, with its own sequence of numbers.
The container's filesystem is also isolated
Like having an isolated process tree, each container also has an isolated filesystem. Listing the contents of the root directory inside the container will only show the files in the container and will include all the files that are in the image plus any files that are created while the container is running.
2.1.7 Stopping and removing a container
docker stop <container-name>docker stop <container-name>To check that the container is stopped, run docker ps -a.
docker rm <container-name>docker rm <container-name>2.1.8 Pushing the image to an image registry
The image you’ve built has so far only been available on your local machine. To allow you to run it on any other machine, you need to push the image to an external image registry.
Docker Hub will allow you to push an image if the image’s repository name starts with your Docker Hub ID.
Like <docker-hub-id>/<image-name>
Tagging an image under an additional tag
docker tag kubia <docker-hub-id>/kubiadocker tag kubia <docker-hub-id>/kubiaThis doesn’t rename the tag; it creates an additional tag for the same image.
By docker images you can see that the image has two tags.
Pushing the image to Docker Hub
docker push <docker-hub-id>/kubiadocker push <docker-hub-id>/kubiaLogin to Docker Hub first.
Running the image on a different machine
docker run -p 8080:8080 -d <docker-hub-id>/kubiadocker run -p 8080:8080 -d <docker-hub-id>/kubiaAfter the push to Docker Hub is complete, the image will be available to everyone.
It doesn’t get much simpler than that. And the best thing about this is that your application will have the exact same environment every time and everywhere it’s run.
2.2 Setting up a Kubernetes cluster
Setting up a cluster from a beginning it isn't a simple task.
We can use single-node local cluster or cluster configured by the cloud providers.
2.2.1 Running a local single-node Kubernetes cluster with Minikube
Minikube is a tool that sets up a single-node cluster that’s great for both testing Kubernetes and developing apps locally.
Installing Minikube
Installing the Kubernetes client (kubectl)
brew install kubectlbrew install kubectlChecking to see the cluster is up and kubectl can talk to it
kubectl cluster-infokubectl cluster-infoI'll skip all parts which are related to Google Cloud Platform.
2.2.3 Setting up alias for kubectl
alias k=kubectl

# bash completion for tabbing, need to install bash-completion
source <(kubectl completion bash | sed s/kubectl/k/g)
alias k=kubectl
# bash completion for tabbing, need to install bash-completion
source <(kubectl completion bash | sed s/kubectl/k/g)Also, can install
oh-my-zshand usekubectlplugin.
2.3 Running your first app on Kubernetes
2.3.1 Deploying your Node.js app
The simplest way is to run kubectl run command without configuration file.
kubectl run kubia --image=luksa/kubia --port=8080kubectl run kubia --image=luksa/kubia --port=8080Introducing pods
Kubernetes doesn't deal with individual containers directly.
Instead, it groups containers into logical units called pods.
A pod is a group of one or more tightly related containers that will always run together on the same worker node and in the same Linux namespace.
Each pod is like a separate logical machine with its own IP, hostname, processes, and so on, running a single application.
The application can be a single process, running in to a single container, or it can be a main application process and additional supporting processes, each running in its own container.
To better understand the relationship between containers, pods, and nodes:
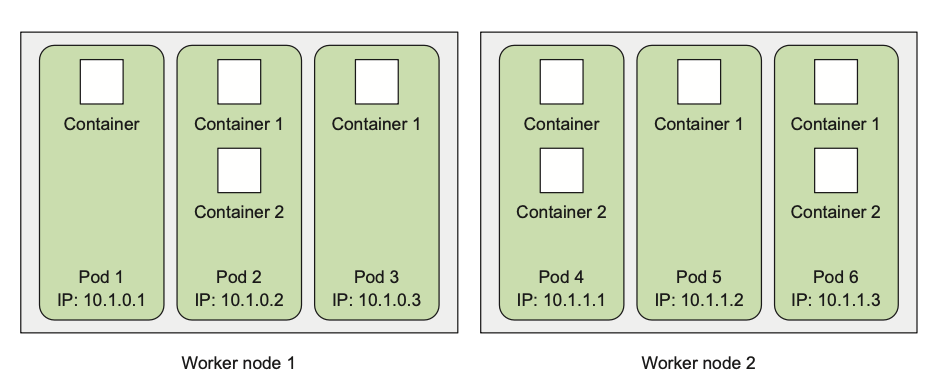
Each pod has its own IP and contains one or more containers, each running an application process.
Pods are spread out across different worker nodes.
Listing pods
kubectl get podskubectl get podsAbout pod statuses: https://kubernetes.io/docs/concepts/workloads/pods/pod-lifecycle/
Pending (downloading images) -> Running -> Succeeded (finished)
To see more information about a pod, run:
kubectl describe pod kubiakubectl describe pod kubiaUnderstanding what happened behind the scenes
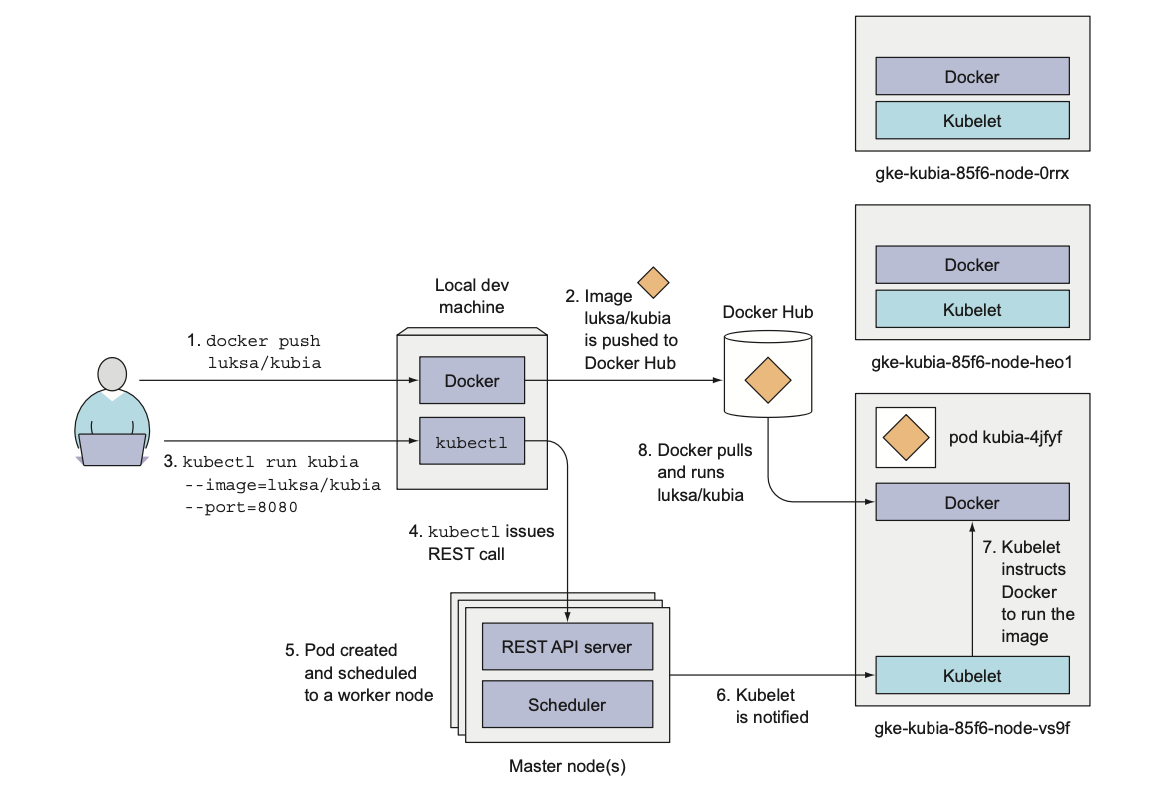
2.3.2 Accessing your web application
Each pod gets its own IP address, but this address is internal to the cluster and isn’t accessible from outside of it.
To make the pod accessible from the outside, you’ll expose it through a Service object.
About service types: https://kubernetes.io/docs/concepts/services-networking/service/#publishing-services-service-types
TL;DR: using LoadBalancer instead ClusterIP because the first one is exposing the service to the outside world.
Create a Service object
kubectl expose pod kubia --type LoadBalancer --name kubia-httpkubectl expose pod kubia --type LoadBalancer --name kubia-httpListing services
kubectl get serviceskubectl get servicesIt may take a few seconds for the service to be assigned an external IP address.
Minikube doesn't support LoadBalancer type, so it will be
pendingforever.
Accessing your service through its external IP
curl <external-ip>:<port>curl <external-ip>:<port>Accessing in Minikube:
minikube service kubia-httpminikube service kubia-httpPod name = hostname.
2.3.3 The logical parts of your system
Worker node = VM + Docker + kubelet + kube-proxy Master node = API server + scheduler + controller manager + etcd
We don't care about the hosting of master components (split between multiple machines), because we are only interacting with the API server.
Understanding how the RC, the Pod, and the Service fit together

Replication Controller (RC) is a Kubernetes object that ensures that a specified number of pod replicas are running at any one time.
Pods are ephemeral (can be created, deleted, and moved around at any time) - IP addresses are not stable, so we need Service to provide a stable IP address and DNS name for a set of pods.
Requests coming to the IP and port of the service will be forwarded to the IP and port of one of the pods belonging to the service at that moment.
2.3.4 Horizontally scaling the application
In book used previous version of Kubernetes, and
--generatorflag is deprecated now.
Creating ReplicationController via spec file:
apiVersion: v1
kind: ReplicationController
metadata:
  name: kubia
spec:
  replicas: 3
  selector:
    app: kubia
  template:
    metadata:
      labels:
        app: kubia
    spec:
      containers:
        - name: kubia
          image: luksa/kubia
          ports:
- containerPort: 8080apiVersion: v1
kind: ReplicationController
metadata:
name: kubia
spec:
replicas: 3
selector:
app: kubia
template:
metadata:
labels:
app: kubia
spec:
containers:
- name: kubia
image: luksa/kubia
ports:
- containerPort: 8080kubectl apply -f rc.yamlkubectl apply -f rc.yamlkubectl get rckubectl get rcExposing the RC as a service:
kubectl expose rc kubia --type=LoadBalancer --name kubia-http-v2kubectl expose rc kubia --type=LoadBalancer --name kubia-http-v2Increasing the desired replica count
k scale rc kubia --replicas 5k scale rc kubia --replicas 5We didn't instruct Kubernetes how to scale the application, we only told it what the desired state is.
This is one of the most fundamental Kubernetes principles. Instead of telling Kubernetes exactly what actions it should perform, you’re only declaratively changing the desired state of the system and letting Kubernetes examine the current actual state and reconcile it with the desired state.
Seeing the results of the scale-out
kubectl get pods -o widekubectl get pods -o wideKeep in mind that the app itself needs to support being scaled horizontally. Kubernetes doesn't magically make your app scalable; it only makes it trivial to scale the app up or down.
Seeing requests hit all three pods when hitting the service
URL=$(minikube service kubia-http-v2 --url)

while true; do curl "$URL"; sleep 0.5; doneURL=$(minikube service kubia-http-v2 --url)
while true; do curl "$URL"; sleep 0.5; doneVisualizing the new state of your system
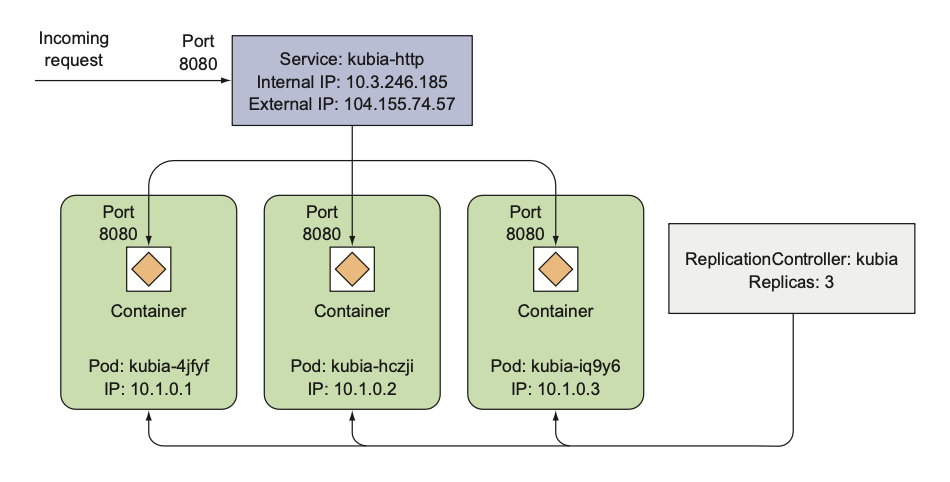
2.3.5 Examining what nodes your app is running on
You may be wondering what nodes your pods have been scheduled to.
In the k8s world, what node a pod is running on isn't that important, as long as it gets scheduled to a node that can provide the CPU and memory the pod needs to run properly.
Each pod has its own IP and can talk to any other pod, regardless of whether that other pod is also running on the same node or on a different one.
Displaying the pod IP and the Node when listing pods
kubectl get pods -o widekubectl get pods -o wideInspecting other details of a pod with kubectl describe
kubectl describe pod kubiakubectl describe pod kubiaThis shows, among other things, the node the pod has been scheduled to, the time when it was started, the image(s) it's running, and other useful information.
2.3.6 Introducing the Kubernetes Dashboard
The Kubernetes Dashboard is a web-based UI that you can use to inspect your cluster - another way to interact with your cluster.
minikube dashboardminikube dashboard2.4 Summary
After reading this chapter, you should now know how to:
- Pull and run any publicly available container image
- Package your apps into container images and make them available to others
- Entering a running container to inspect its environment
- Alias
kubectltokand enable bash completion - List and inspect nodes, pods, services and replication controllers in your cluster
- Have basic sense of how pods, rc and services relate to each other
- Scale up and down your app by changing the desired state of the system
- Access the web-based Kubernetes Dashboard